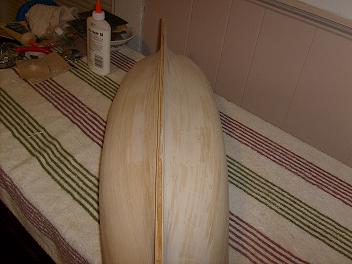
the lower stern cap was a particular interest to me. to plank this area along with the rest of the hull, meant that I was going to have to soak the end of the planks. the configuration of this particular hull is gradual, until the planks got to that point, at the stern. I had started using another type of glue {testor's, for wood and metal} and I didn't know if it would bond to moist wood. so, I opted to leave this area open and create a cap, much like the upper cap {shown above}. using the testor's glue meant that the drying time was significantly less and i could do more planks at a sitting. when I had to revert to using the pins, I tried to do a few more, than if i was using the white glue. with the pins, it was still, slow going. as I got near the keel and the last few planks, I ran out of the testor's glue. being between paychecks and no extra money to get more, I went back to the white glue. it had no effect on the speed in which I was working, it just meant that I would have to wait overnight before I could put more on. today, the 28th of September, I finished the planking of the hull. I was very happy to see it finished.


now I could focus on the lower stern cap. I made a piece to fit it, using some flat stock {there were a couple wide strips in the kit when I got it....Harold must have bought them}, but when I tried to fit it into place, it would crack and break. I did a couple more tries, only to end up with the same results. I even tried to change the direction of the grain, but it didn't help. I was at a loss as to what to do about it. the only recourse I could come up with was to plank it. I took a few short pieces that were left over and soaked them in water for about an hour, wrapped in a wet towel. while this was going on , I applied some wood filler to the hull where there were gaps and divots from the nails. I also did the contour for the stern stem and along the rabbits leading to the bow. I have tubes of wood filler that I had for quite a while.....the filler was very stiff. I kneaded the tube until there was a gap at the top and poured water into it. it's called Elmer's wood filler and suggested a water clean-up...so, I figured that was what i could use to thin it. putting the cap on and insuring the seal with a piece from a sandwich bag, I kneaded the tube....shook it, and kneaded it some more until it became a thin paste. using a plastic spreader, I was able to apply it as a very thin coat. this would insure that it would get into even the smallest of cracks and that it would spread smoothly. sanding would not be such a problem.....start with a medium grit and then finish off with a fine grit. by this time, the planks were ready to be used. it didn't go the way i had hoped. it looked like a pin cushion...and if that wasn't bad enough, the ends kept coming up, so i had to reposition the pins. I gave it the afternoon to dry, when I had checked it the last time before supper, they were still not dry enough to be sanded. after supper came out of the oven......I got an idea. I took ole' Nordie and set him on top of the stove with his stern hanging over the edge and then I opened the oven door a crack. the heat will cure it! after supper and checking for any e-mails, I went to check on my patient. a couple of key pokes told me that my idea worked and I brought him back to the table. there I sanded the cap down into shape and did the rest of the hull. after i sucked up the sanding dust from the hull and the table, I could see improvement....I was very happy with the results.